
Get 50% OFF QuickBooks for 3 months*

Buy now
Switch to QuickBooks and 70% off for 3 Months
November 13, 2025
Solved

How do you create multiple checks in the Write Checks to record checks that have been written outside QB. Save & Close requires reopening for multiple checks?

  • November 13, 2025
  • 1 reply
  • 20 views

I have previously printed multiple checks that need to be brought into Quickbooks and I don't like having to enter ck#7500 and then reopening to enter 7501 and then again for 7502 and on and on

Best answer by FatimaJasmin_V

Hello and welcome to the Community, wbcaa2013.


To save time and avoid reopening the "Write Checks" window for each entry, use Save and new instead of Save and close when entering multiple checks written outside of QuickBooks.



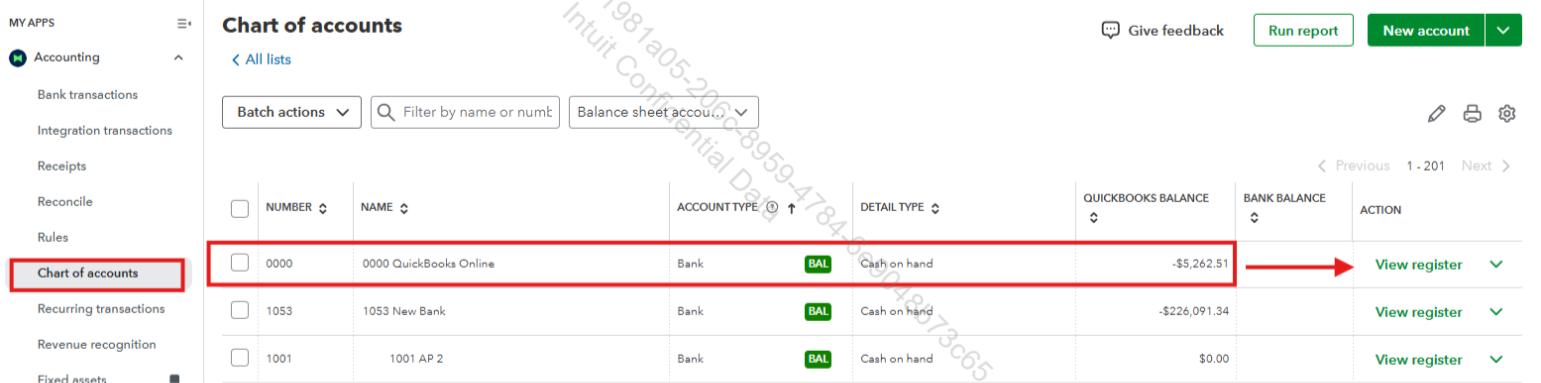
On the other note, you can record checks directly on the Chart of accounts page, which opens a blank form for the next check, allowing quick entry without reopening the window, ideal for handling multiple checks efficiently.


Here’s how:


1. On your dashboard, go to My apps on the left sidebar.

2. Click Accounting.

3. Under Accounting, select Chart of accounts.

4. Ensure you select the correct bank account.

5. Click View register.


6. Under the Date field, click the drop-down arrow and select Check.
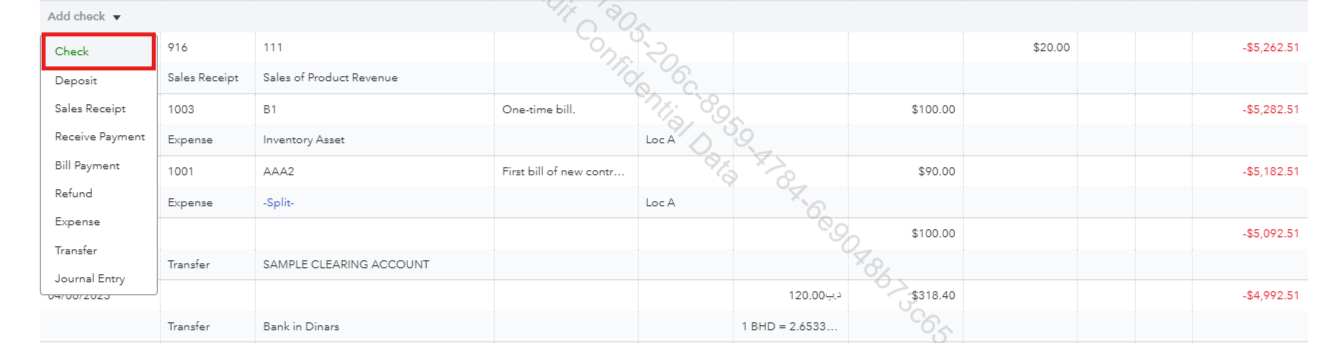


7. Complete the required fields.

8. Click Save.



If you have any additional questions or concerns related to QuickBooks, feel free to reply to this thread.

1 reply

QuickBooks Team
November 13, 2025

Hello and welcome to the Community, wbcaa2013.


To save time and avoid reopening the "Write Checks" window for each entry, use Save and new instead of Save and close when entering multiple checks written outside of QuickBooks.


On the other note, you can record checks directly on the Chart of accounts page, which opens a blank form for the next check, allowing quick entry without reopening the window, ideal for handling multiple checks efficiently.


Here’s how:


1. On your dashboard, go to My apps on the left sidebar.

2. Click Accounting.

3. Under Accounting, select Chart of accounts.

4. Ensure you select the correct bank account.

5. Click View register.


6. Under the Date field, click the drop-down arrow and select Check.


7. Complete the required fields.

8. Click Save.


If you have any additional questions or concerns related to QuickBooks, feel free to reply to this thread.

QuickBooks Team
November 14, 2025

Hi, wbcaa2013.


I just wanted to follow up to check if the resolution we provided helped resolve your issue.


Please let us know if everything is now working as expected or if you’re still experiencing any problems.
We’ll be glad to assist further if needed.