


Your Top 5 QuickBooks Questions Answered - July 2026

Accurate books depend on reliable bank connections and clean reconciliations, and when either one runs into trouble, it can slow everything else down. This month, QuickBooks customers came to the Community with questions about reconnecting bank feeds, recording canceled payments, and balances that wouldn't match. Below, you'll find the five questions asked most often in July, along with step-by-step guidance for resolving each one with confidence.
When I reconnect my bank, QuickBooks creates a new account instead of linking to my existing one. How do I fix that?
This usually happens when the account you want to reuse is still tied to its old connection. Because QuickBooks doesn't see it as available, it spins up a brand-new account instead. The trick is to free up the existing account before you reconnect.
Step 1: Note your last downloaded transaction
Open the register for the account and write down the date of the most recent transaction that came in through the old bank feed. You'll use this date when you relink so nothing is missed or duplicated.
Step 2: Disconnect the account
Go to your Chart of Accounts, find the bank or credit card account, and select Edit. Check the box for Disconnect this account on save, then select Save. This releases the account so it can be chosen during reconnection.
Step 3: Reconnect and choose the existing account
Head back to Bank transactions and select Link account (or Connect account). Sign in to your bank, and when QuickBooks asks which account to link the feed to, pick your existing account from the dropdown rather than creating a new one. When prompted for a start date, enter the date from Step 1.
Tip: If a duplicate account was already created, don't panic. You can merge the duplicate into your original account from the Chart of Accounts so your history stays in one place.
Learn more: Reconnecting Bank Feed to already established accounts
I can't reconfirm my consent to keep seeing account updates (error 381). The "Manage consent" button is inactive.
Some banks require you to periodically reconfirm that QuickBooks has permission to pull your account data. Error 381 is the nudge that it's time. Here's how to reconfirm, plus what to do if the button won't cooperate.
Step 1: Reconfirm your consent
- Go to Transactions, then Bank transactions.
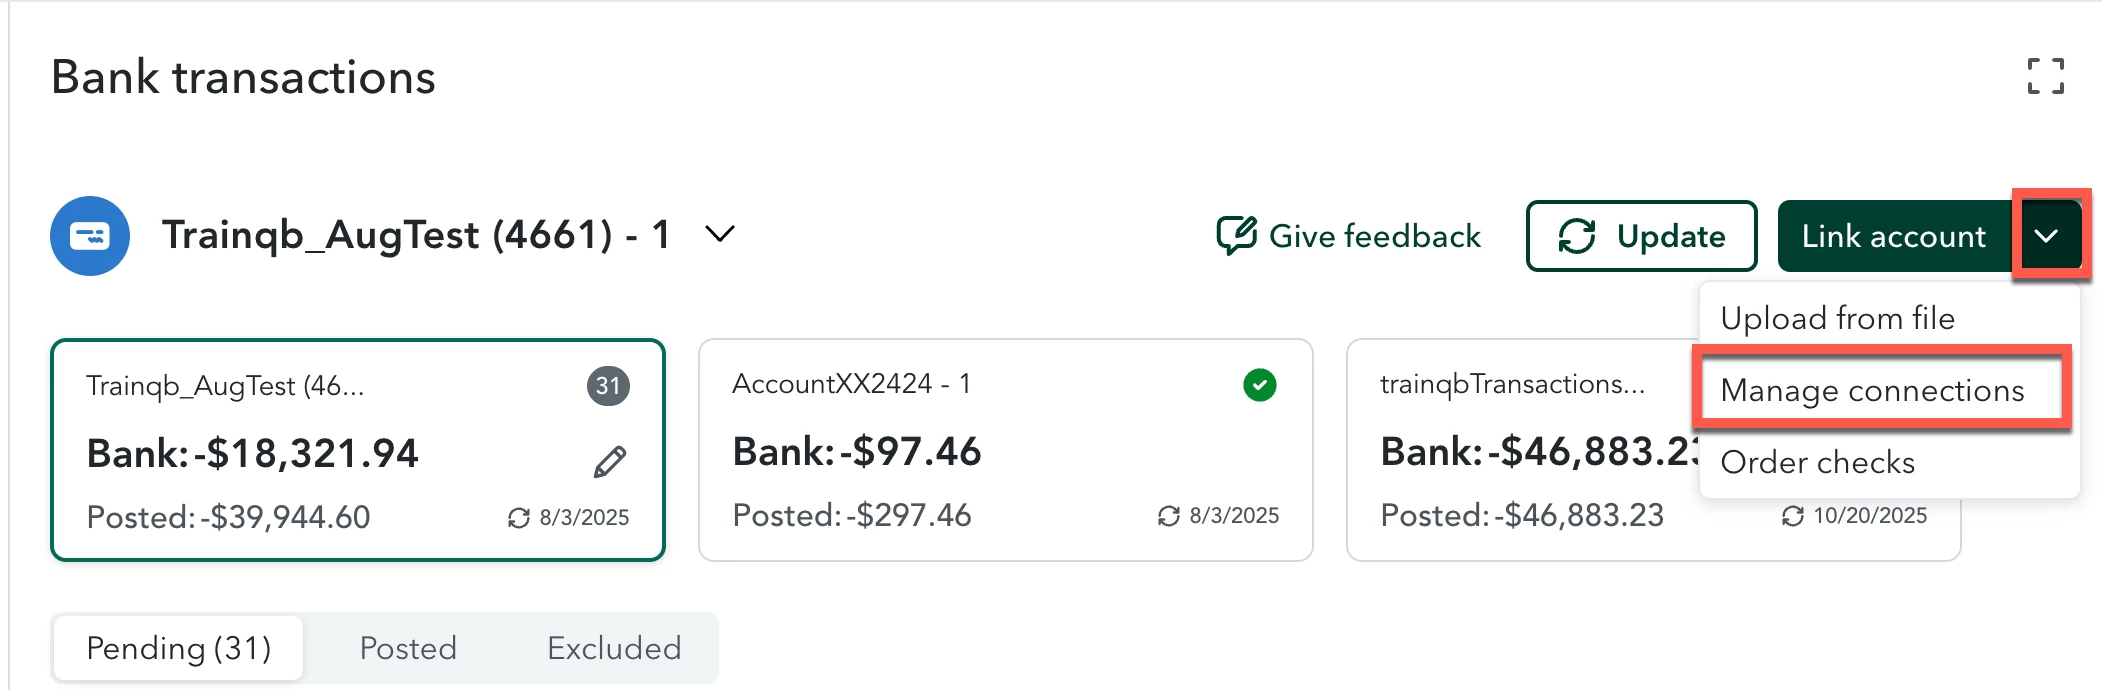
- Select the dropdown ▼ next to Link account, then choose Manage connections.
- Next to the bank that needs attention, select the More ⋮ icon.
- Choose Manage consent, select Reconfirm, then OK to confirm.
Step 2: If the button is grayed out, rule out your browser
An inactive Manage consent button is most often caused by browser cache buildup. Open a private window and try again:
- Google Chrome: Ctrl + Shift + N
- Mozilla Firefox: Ctrl + Shift + P
- Safari: Command + Shift + N
If the button works in the private window, clear your regular browser's cache to remove the stored data causing the problem. If it still doesn't respond, try a different supported browser.
Tip: Some users have also restored the button by selecting the account card on the Bank transactions page, clicking the pencil (Edit) icon, and choosing Edit sign-in info.
Learn more: I can't reconfirm my consent to continue seeing account updates (381)
A customer's bank transfer was canceled. How do I record it so my books stay accurate?
When a customer's ACH or bank transfer is returned, the payment you recorded no longer reflects reality, so the goal is to reverse it, reopen the invoice, and (optionally) pass along any bank fees. Because these entries touch several parts of your books, it's a good idea to loop in your accountant before you start.
Step 1: Record the reversal from your bank feed
- Go to Transactions, then Bank transactions.
- Find the returned payment in the feed and click it to expand the details.
- In the Vendor/Customer ▼ dropdown, choose the customer whose transfer was canceled.
- In the Account ▼ dropdown, select Accounts Receivable, then select Add.
This offsets the payment so the invoice balance comes back to life. If your bank isn't connected to QuickBooks, create an expense posted to Accounts Receivable for that customer instead; it can be matched once the bank activity comes through.
Step 2: Unlink the canceled payment from the original invoice
- Go to Sales, then Customers, and open the customer's profile.
- Find the payment tied to the canceled transfer and select the pencil icon to edit it.
- Uncheck the original invoice, check the new reversal entry you just created, then select Save and close and confirm with Yes.
Step 3 (optional): Invoice the customer for bank fees
If your bank charged you for the returned transfer, select + New, then Invoice. Choose the customer, date the invoice for the day the fee posted, add a bank-fee service item with the amount, and save. Sending the customer a statement is a nice final touch so they can see both the reopened invoice and the fee.
Learn more: Handle a cancelled bank transfer
Transactions I already reconciled are showing up as uncleared again. How do I fix it?
Seeing reconciled entries pop back up on an uncleared list (often in Books Review) is confusing, but there are three usual suspects. Work through them in order:
Check the reconcile status in the register
Someone editing a reconciled transaction can knock its status loose. Go to the Gear icon, select Chart of Accounts, find the account, and choose View register. Reconciled entries show an R in the checkmark ✔ column. If an entry is blank, click the field to update its status and select Save.
Note: Changing reconcile statuses by hand affects prior reconciliations, so it's wise to confirm with your accountant first.
Look for duplicates
A manually entered copy of a downloaded transaction will sit around looking uncleared forever. If you spot a duplicate, delete the extra entry from the register, or exclude the downloaded copy from the For Review tab.
Check the other side of the transaction
Here's the one that trips up even seasoned bookkeepers: if a transaction posts to two balance sheet accounts (think transfers or journal entries), QuickBooks considers it uncleared until both accounts have been reconciled, no matter how many times you reconcile the bank side. You can either reconcile the second account, or, in Books Review, use Select accounts to limit the uncleared list to only the accounts you actually reconcile.
Learn more: Reconciled transactions showing as uncleared
QuickBooks won't let me enter the correct beginning balance to reconcile. It's wrong.
First, a little context that explains the frustration: the beginning balance field isn't a free-form box. QuickBooks calculates it automatically from your last reconciliation's ending balance (or from the account's opening balance if you've never reconciled). So rather than typing over it, you fix whatever is feeding it.
Step 1: Confirm you're in the right place
Go to Transactions, then Reconcile, and double-check the Account ▼ dropdown. If you have multiple accounts at the same bank, or more than one account of the same type, it's surprisingly easy to be reconciling the wrong one.
Step 2: Reconciling for the first time? Correct the opening balance
- Go to the Gear icon and select Chart of Accounts.
- Find the account and select View register.
- Sort the Date column oldest-first and open the Opening Balance entry.
- Correct the amount, then select Save.
Note: The opening balance is the starting point from when you began tracking the account in QuickBooks; the beginning balance is the ending balance of your last reconciled period. Fixing the first often fixes the second.
Step 3: Reconciled this account before? Track down what changed
If the account reconciled fine in the past, a previously reconciled transaction was likely edited, deleted, or unreconciled since then, and that's what shifted your beginning balance. QuickBooks can help you pinpoint the change so you can restore or re-mark the affected transactions, and the beginning balance will recalculate on its own.
Learn more: Update the beginning balance to reconcile
Reconciliation issues rarely fix themselves, but as you can see, most of them come down to one small setting or one stray transaction. Bookmark this post for the next time your bank feed misbehaves, and if you hit something we didn't cover here, drop your question in the Community. Chances are it'll show up in a future edition of this series.